Total Pageviews

Popular Posts

Sunday, October 23, 2011

Creating your Personal Run Commands


How to Create Your Own Customized Run Commands

Run command
The Run command on Microsoft Windows operating system allows you to directly open an application or document with just a single command instead of navigating to it’s location and double-clicking the executable icon. However, it only works for some of the inbuilt Windows programs such as Command prompt (cmd), Calculator (calc) etc. So, have you ever wondered how to create your own customized Run commands for accessing your favorite programs, files and folders? Well, read on to find out the answer.

Creating the Customized Run Command

 
Let me take up an example of how to create a customized run command for opening the Internet explorer. Once you create this command, you should be able to open the Internet explorer just by typing “ie” (without quotes) in the Run dialog box. Here is how you can do that.
1. Right click on your Desktop and select New -> Shortcut.
2. You will see a “Create Shortcut” Dialog box as shown below
Create Shortcut


3. Click on “Browse”, navigate to: Program Files -> Internet Explorer from your Root drive (usually C:\) and select “iexplore” as shown in the above figure and click on “OK”.
4. Now click on “Next” and type any name for your shortcut. You can choose any name as per your choice; this will be your customized “Run command”. In this case I name my shortcut as “ie”. Click on “Finish”.
5. You will see a shortcut named “ie” on your desktop. All you need to do is just copy this shortcut and paste it in your Windows folder (usually “C:/Windows”). Once you have copied the shortcut onto your Windows folder, you can delete the one on your Desktop.
6. That’s it! From now on, just open the Run dialog box, type ie and hit Enter to open the Internet Explorer.
In this way you can create customized Run commands for any program of your choice. Say “ff” for Firefox, “ym” for Yahoo messenger, “wmp” for Windows media player and so on.
To do this, when you click on “Browse” in the Step-3, just select the target program’s main executable (.exe) file which will usually be located in the C:\Program Files folder. Give a simple and short name for this shortcut as per your choice and copy the shortcut file onto the Windows folder as usual. Now just type this short name in the Run dialog box to open the program.
I hope you like this post! Pass your comments.

Avoiding Phishing.... Securing ur account


How to Identify and Avoid Phishing Scams

Phishing Scam
Phishing is a form of social engineering technique used by hackers to gather sensitive information such as usernames, passwords and credit card details by posing as a trustworty person/organization. Since most online users are unaware of the techniques used in carrying out a phishing attack, they often fall victims and hence, phishing can be very effective.
With the dramatic increase in the number of phishing scams in the recent years, there has also been a steady rise in the number of people being victimized. Lack of awareness among the people is the prime reason behind such attacks. This article will try to create awareness and educate the users about such online scams and frauds.
Phishing scams usually sends an email message to users requesting for their personal information, or redirects them to a website where they are required to enter thier personal information. Here are some of the tips that can be used to identify various phishing techniques and stay away from it.

Identifying a Phishing Scam

1. Beware of emails that demand for an urgent response from your side. Some of the examples are:
  • You may receive an email which appears to have come from your bank or financial organization stating that “your bank account is limited due to an unauthorized activity. Please verify your account asap so as to avoid permanant suspension”. In most cases, you are requested to follow a link (URL) that takes you to spoofed webpage (similar to your bank website) and enter your login details over there.
  • In some cases, phishing emails may ask you to make a phone call. There may be a person or an audio response waiting on the other side of the phone to take away your credit cards details, account number, social security number or other valuable data.
2. Phishing emails are generally not personalized. Since they target a lagre number of online users, they usually use generalized texts like “Dear valued customer”, “Dear Paypal user” etc. to address you. However, some phishing emails can be an exception to this rule.
3. When you click on the links contained in a phishing email, you will most likely be taken to a spoofed webpage with official logos and information that looks exactly same as that of the original webpages of your bank or financial organization. Pay attention to the URL of a website before you enter any of your personal information over there. Even though malicious websites look identical to the legitimate site, it often uses a different domain or variation in the spelling. For example, instead of paypal.com, a phishing website may use different addresses such as:
  • papyal.com
  • paypal.org
  • verify-paypal.com
  • xyz.com/paypal/verify-account/

Tips to Avoid Being a Victim of Phishing

1. Do not respond to suspicious emails that ask you to give your personal information. If you are unsure whether an email request is legitimate, verify the same by calling the respective bank/company. Always use the telephone numbers printed on your bank records or statements and not those mentioned in the suspicious email.
2. Don’t use the links in an email, instant messenger or chat conversation to enter a website. Instead, always type the URL of the website on your browser’s address bar to get into a website.
3. Legitimate websites always use a secure connection (https://) on those pages which are intended to gather sensitive data such as usernames and passwords, account numbers or credic card details. You will see a lock icon Picture of the Lock icon in your browser’s address bar which indicates a secure connection. On some websites like paypal.com which uses an extended validation certificate, the address bar turns GREEN as shown below.
HTTPS Address Bar


In most cases, unlike a legitimate website, a phishing website or a spoofed webpage will not use a secure connection and does not show up the lock icon. So, absence of such security features can be a clear indication of phishing attack. Always double-check the security features of the webpage before entering any of your personal information.
4. Always use a good antivirus software, firewall and email filters to filter the unwanted traffic. Also ensure that your browser is up-to-date with the necessary patches being applied.
5. Report a “phishing attack” or “spoofed emails” to the following groups so as to stop such attacks from spreading all over the Internet:
You can directly send an email to spam@uce.gov orreportphishing@antiphishing.org reporting an attack. You can also notify the Internet Crime Complaint Center of the FBI by filing a complaint on their website: www.ic3.gov.

Thursday, October 13, 2011

Unblocking a disabled USB port... (very important to college guys)

 A very important trick for college guys....

Many colleges, including mine, blocks USB Ports. By this we are not able to use pen drive or other USB enabled portable devices. The ways by which the USB ports are disabled by Administrator are many. In this article I mentioned some ways to unblock Pen Drive USB Port in Colleges. Hope you won’t misuse them. Here are the 3 ways.
1. By Disabling USB Ports from Device Manager.
2. By Tweaking Registry values for USB Mass Storage Devices.
3. By Un-installing the USB Mass Storage Drivers.
Unlock USB ports from device manager:

device manager
1. Go to Run and type “Devmgmt.msc” and press Enter.
2. Go to Universal Serial Bus Controller. See if there are any red colored cross? If yes, right click and enable those USB Ports.
Now try and use the pen drive. If it works fine, then great, else read the next two steps also.

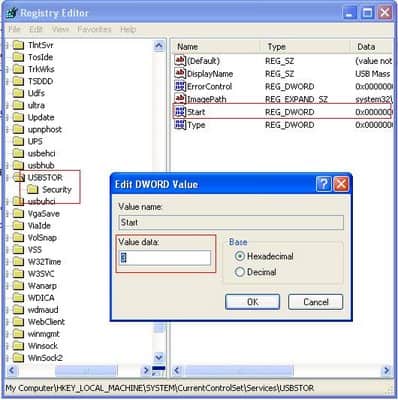
Correct Value for USB Mass Storage device

Correct Registry Value
1. Go to Start > Run , type “regedit” and press enter, this will open registry editor.
2. Navigate to the key HKEY_LOCAL_MACHINE\SYSTEM\CurrentControlSet\Services\USBSTOR
Now remove and connect the pen drive again, it should work fine, if it does not, then it means the drivers are missing. Follow the steps below to solve the issue.

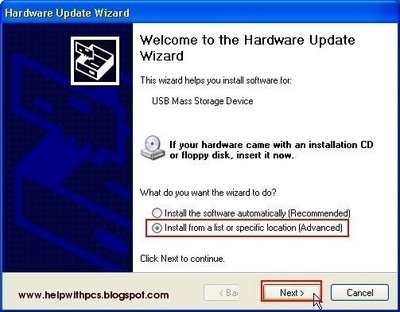
Install USB Mass Storage Device drivers

Install USB Mass Storage
In case the USB Mass Storage drivers are not installed, windows will prompt you to install the driver. In such a case, windows will launch Hardware Update Wizard. If you have USB Mass storage drivers, you can install it and restart the computer, it should work. If not, you can download the USB Mass Storage drivers here. Download and uznip the driver files on your desktop.
i) In hardware update wizard, Select the option to install the driver from a specific location and click next.
ii) Now on this screen, click browse and select the path on which you have un-zipped the drivers and press ok.

NOTE: Windows may give you a warning that the drivers has not passed Windows logo testing, so stop installation or Continue anyway, Select Continue anyway to complete installation.
Now restart your computer and re-insert your pen drive, it should now work.